Skip to content

Sourdough Bread

Friday, June 26, 2020

Yes, I caught the #sourdough bread fever during this time of #quarantinecooking. Actually, I used to bake bread quite often, but this-and-that, blah-blah-blah, and my starter turned into a science project. So I pulled out my frozen backup and was delighted at how quickly it came back to life. I knew there was a reason I’d named it Lazarus!

So then I messed around with several recipes, consolidated them, and made some of my own adjustments. I’m pleased with the results.


SPONGE:

  • 125 g. starter, refreshed no more than 12 hours earlier
  • 120 g. filtered water, at 80°
  • 150 g. bread flour or unbleached, all-purpose flour with a protein level of between 11-13%

Make the Sponge:

In a bowl with at least 1 quart capacity, stir the starter with the water until fully combined. Then stir in the flour. Let ferment at room temperature for 2-3 hours.

DOUGH:

  • 350 g. filtered water, at 70°
  • 700 g. bread flour or unbleached all-purpose flour with a protein level of between 11-13%
  • 15 g. salt

Make the Dough:

Add water and sponge to the bowl of a standing mixer.

Using a dough hook, with mixer running at lowest speed, add the flour, a scoop at a time. Once all the flour has been added in, continue to mix until dough forms a ball, and then let the mixer run one minute longer.

Cover bowl with plastic wrap, and allow dough to rest for 20 minutes.

Knead the Dough:

Using your fingers, make a little pocket in the dough and add the salt to that pocket. Knead dough on low speed until it is smooth, soft, and moist, about 5 minutes.

Transfer dough to clean work surface and knead for a minute by hand, until dough forms a firm ball.

Let the Dough Rise:

Spray large plastic tub with non-stick cooking spray and place dough in bowl. Invert dough to distribute oil all over the dough, and put on the lid. Let stand until dough doubles in size (3-5 hours).

Stretch and Fold the Dough:

Scrape dough out onto a clean wooden board. Gently stretch dough to redistribute and refresh yeast, as far as possible without tearing it, and then fold dough into thirds, like a letter.

Divide and Shape the Loaves:

Using a bench scraper, divide dough in half. Form each half into the desired loaf shape, and cover with plastic wrap, allowing the dough to relax for 15-20 minutes.

Continue to form the shape, and place each loaf seam side down on a separate sheet of parchment paper. Place them on top of an inverted sheet pan, spray each loaf with cooking spray, and cover with plastic wrap.

Refrigerate the Loaves Overnight:

Place the baking sheet with the loaves on parchment paper, covered in plastic wrap, in the refrigerator overnight, between 8-12 hours.

Proof the Loaves:

Remove the loaves from the refrigerator and from the sheet pan. Place in bannetons which have been lightly sprayed with water and dusted with rice flour. Cover with parchment paper and let rise until doubled in size, for 3-4 hours.

Baking:

After 3 hours, place Dutch oven with the lid in the oven with the rack in the lower-middle position. Preheat oven to 500°.

Sprinkle the first loaf with cornmeal and tip it out of the form with the parchment paper beneath. Wet the blade of a lame, razor blade, or serrated knife, hold it at a 45° angle, and without hesitating, quickly slash the surface of the loaf ½” deep, two, three, or four times. Working quickly, spray the surface of the loaves with water.

Bake the Bread:

Carefully slide the parchment paper and the loaf into the preheated Dutch oven, and put the lid on. Place in the oven and reduce the temperature to 450°. Bake for 25 minutes.

Carefully remove the lid, lift out the bread with the parchment paper, and remove the paper. Leave the lid off and bake for an additional 25-30 minutes.

Transfer the bread to a cooling rack for at least 2-3 hours.

Repeat with second loaf.

When done, place the Dutch oven on the stovetop and allow to completely cool before cleaning. Do yourself a favor and place an oven mitt or hot pad on top to remind yourself that it’s hot!

(CMT) Tuscan Grilled Ribs

Wednesday, April 10, 2019

Sourdough Bread

Friday, March 15, 2019


Description

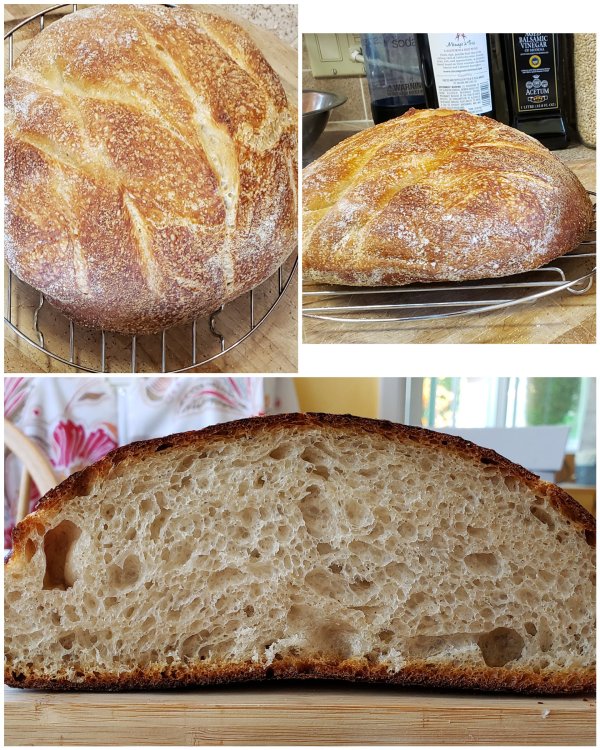
An easy, step-by-step tutorial on how to make Beginners Sourdough Bread! This recipe makes 2 loaves.


Ingredients

  • 200 grams levain
  • 800 grams unbleached bread flour
  • 200 grams whole wheat flour
  • 750 grams water (reserve 50grams)
  • 20 grams salt

Instructions

  1. Build the Levain – The night before you wish to mix the dough, combine 1 tablespoon mature starter, 100 grams water and 100 grams all-purpose unbleached flour in a clean jar. Cover and let sit overnight.
  2. Autolyse – Mix the levain, 800 grams bread flour, 200 grams whole wheat flour and 700 grams of water in a large mixing bowl with your hands or a spatula until it forms a sticky, shaggy mass. Cover the bowl with plastic wrap or a towel and let rest for 1 hour.
  3. Add Salt – Add 20 grams of salt and the remaining 50 grams of water to the dough. Use your hands to pinch the dough so that the salt and water are incorporated well. Cover the bowl and let rest for 1 hour.
  4. Bulk Fermentation – Remove the cover and stretch and fold the dough. Starting on the right side, wet your hand and then pull the dough up and over it’s self to the opposite side of the bowl. Turn the bowl a quarter-turn and repeat this 3 times until you have completed 4 stretch and folds. Repeat for a total of 3 sets every 30 minutes. Cover and let rise on the counter at room temperature for 4-5 hours or until the dough has risen 1.5 times it’s original size.
  5. Pre-shape – Turn the dough out onto a clean surface and cut the dough in half. Use the bench scraper to shape the dough into a tight round. Cover with a towel and let rest for 20 minutes.
  6. Final Shape – Lightly flour the top of the dough and flip it over using the bench scraper. Pull the right side up and over to the center. Repeat with the left, top and bottom sides. Flip the seam side down, cup your hands around the dough and gently pull it towards your self. Turn the dough in a circular motion on the work surface and repeat these steps until the dough has a “tight skin”. Dust the top of the dough with flour and place it in a bowl, seam side up, that’s been lined with a floured tea towel. Let rest on the counter for 30 minutes, cover with plastic and place in the refrigerator overnight to ferment.
  7. Bake – Preheat oven to 450 degrees (without the Dutch oven inside). Remove the sourdough from the refrigerator, place a piece of parchment paper on top and invert the dough onto the paper. Use the paper to pick up the dough and place it into the cold Dutch oven. Score the top of the dough with a razor or sharp knife. Cover and bake for 30 minutes. Remove the cover and bake for 15-20 minutes.
  8. Cool – Carefully remove the bread from the Dutch oven and let cool for 2 hours before slicing.

Notes

  • Levain is made by using this Sourdough Starter.
  • This recipe can be halved to make one loaf.
  • Each loaf contains 20 slices.

Nutrition

  • Serving Size: 1 slice
  • Calories: 84
  • Sugar: 0
  • Sodium: 194
  • Fat: 0
  • Carbohydrates: 18
  • Protein: 3

https://amyinthekitchen.com/beginners-sourdough-bread/print/15339/

Instant Pot Chicken Noodle Soup

Tuesday, December 11, 2018

Prep Time: 10 mins

Cook Time: 20 mins

Total Time: 50 mins

Ingredients
1 tablespoon olive oil
1 small onion, diced
3 cloves garlic, minced
5 carrots, scrubbed and sliced
2 celery sticks, sliced
1 whole 5 pound chicken (giblets removed and discarded or saved for another use)
2 tablespoons fish sauce
8 cups water
2 teaspoons kosher salt
3/4 teaspoon freshly ground black pepper
4 ounces extra wide egg noodles

Instructions
Set IP to Sauté function.

Heat olive oil and onions until onions start to soften and become translucent, 2-3 minutes.

Add garlic, carrots and celery and saute for another minute.

Add whole chicken to IP, followed by water, soy sauce, 2 teaspoon of salt and 3/4 teaspoon freshly ground pepper.

Turn off Sauté function, lock IP lid in place, make sure pressure valve is set to sealing and set IP to High Pressure for 20 minutes, via manual mode.

IP will take 15-20 minutes to come to pressure, then will countdown from 20 minutes. After 20 minutes at High Pressure, IP will beep and switch to Keep Warm mode.

Turn pressure release valve to Quick Release pressure. Carefully open IP, keeping lid angled away from you to avoid very hot steam.

Remove whole chicken and set aside to shred. Turn IP back to Sauté function and let chicken broth come to a boil.

Stir in egg noodles and let cook for about 5 minutes.

While noodles are cooking, shred chicken into bite sized pieces discarding bones and skin.

Once noodles are cooked, stir in chicken meat.

Adjust salt and pepper to taste.

Chuck Roast Enchiladas

Wednesday, October 24, 2018

Being an avid BBQer, I’m more than likely to slow cook my chuck roast in my Weber kettle, but you can cook it in a slow cooker or however you like.

Makes 6-8 servings

Ingredients
2 lb. chuck roast cooked and shredded
10 oz can tomatoes and green chilies, drained
2 cups shredded cheddar cheese
1 large can red enchilada sauce
2 tbsp tomato paste
1/2 tsp. garlic powder
salt and pepper to taste
10-12 corn tortillas (or flour if you prefer)

Instructions
Mix the roast with tomatoes and green chilies and 1-1/2 cups cheese.
Stir enchilada sauce, tomato paste, garlic powder, salt and pepper together in a bowl.
Spray 9×13 casserole dish with cooking spray.
Add a spoon of sauce to the bottom and spread around.
If using corn tortillas, lightly fry in a little oil, then drain. (You want them to still be soft.) Use flour tortillas as is.
Fill tortillas with meat, roll and place seam side down in the dish.
Pour remaining sauce over top.
Top with remaining cheese.
Bake at 350° for 20-30 minutes, until hot and bubbly. Sprinkle with finely sliced green onions and/or chopped fresh cilantro.

Serve with a salad and beans (I like frijoles de olla – well-seasoned whole pinto beans).

Chicken Dry Rub

Tuesday, September 18, 2018
tags: , ,
Note: Remember Shake ‘n Bake? This smells a lot like that. Good on chicken, and also on pork.

    INGREDIENTS

    • 3 tsp kosher salt
    • 1 tsp black pepper
    • 1 tbs granulated garlic
    • 1 tbs paprika
    • ½ tsp cayenne
    • ½ tsp ground cumin
    • ½ tsp ground coriander
    • 1 tsp sage
    • 1 tsp oregano
    • 1 tbs brown sugar

    Lemony Herb Chicken

    Sunday, June 17, 2018

    Ingredients

    1/3 cup Dale’s Seasoning or Dale’s Reduced Sodium Blend
    3 tablespoons apple cider vinegar
    1/3 cup lemon juice plus zest from lemon
    1 tablespoon Dijon mustard
    1 tbsp honey
    1 teaspoon herbes de province
    2 garlic cloves, minced
    1 can pilsner beer
    1 chicken (whole, spatchcocked, or parts), or 3-4 pounds parts

    Directions

    In a medium bowl, mix together Dale’s Seasoning, vinegar, lemon juice and zest, mustard, honey, herbs, and garlic. Place chicken in marinade and turn until well coated. Cover and marinate in refrigerator for one hour, or overnight if desired, turning occasionally.

    Remove chicken from marinade and pat dry; discard marinade. Grill chicken as desired. Breast should be 165°, dark meat 180°.

    Adapted from Dale’s Seasoning Lemony Herb Chicken recipe

    Grill-roasted Potato Salad

    Tuesday, May 29, 2018

    My mom grew up in Western Kansas during the Dust Bowl and the Great Depression. Their microscopic town offered family, farm, school, and church. Mom fell in love with potato salad at the church potlucks, filling her plate from all of the offerings — and she loved them all. So when I make potato salad I always remember my mom. Three-day weekends almost always include it.

    I made one a bit different this past weekend, with a BBQ twist. And here’s the thing about potato salad: adjust quantities to your own preference. Leave out the eggs, or use Greek yogurt, sour cream, or even Miracle Whip for the mayo. It’s all good!

    Ingredients

    1½ pounds Yukon Gold potatoes, cut into 2-3″ chunks (I don’t peel them)

    3 eggs, hardboiled

    ⅓ cup dill pickles, finely chopped

    3 green onions (white part and 2″ of green tops), sliced thin

    1 stalk celery, diced

    Vinaigrette (see below)

    Mayonnaise

    Salt and pepper

    Directions

    Prepare vinaigrette: mix ½ cup olive oil, ¼ cup white wine vinegar, 2 tablespoons Dijon or whole grain mustard, a generous amount of salt and pepper. (Add herbs like thyme, tarragon, herbes de Province, etc., if you like.)

    To make perfect hardboiled eggs, place eggs that are at least a week old in a large saucepan. Cover with a generous amount of cold water. Bring to boil. Cover and turn off heat, setting a timer for 13 minutes. While they cook prepare an ice bath in a large bowl. When timer goes off, immediately move eggs to ice bath, cracking in several places. Set timer for five minutes. When time is up gently peel eggs. Place in refrigerator until ready to use.

    Place chunks of potatoes in a large sheet of aluminum foil. Add olive oil to coat well. Add a good amount of salt and pepper. Seal packet and place on the indirect side of a BBQ (can be with / on top of whatever else you’re cooking at the time). Cook until potatoes are soft. Open packet and move to the direct side of the grill to add a little color and smoke. Keep an eye on them so they don’t burn.

    Remove from foil packet to a large sheet pan. Pour a vinaigrette over potatoes and use the foil from the packet to close. Leave in a cool place to macerate. (I did this in the evening and continued prep the next morning.

    Next morning: Cut potatoes into smaller chunks if desired. Place in non-reactive bowl along with any of the vinaigrette that didn’t soak in. Chop eggs and add to bowl along with pickles, green onions, and celery. Stir gently to mix. Check for seasoning. Add just enough mayonnaise to moisten everything. Cover bowl and refrigerate for several hours, allowing flavors to meld. (Like my mom, I always think it’s even better the next day.)

    Bourbon Street Marinade

    Wednesday, May 16, 2018

    This is one of those recipes that many lay claim to, but it’s hard to know who came up with it first. I got it from a Weber bbq book that’s so old that it’s falling apart, so I give them credit. It doesn’t really matter. All I can say is that this is good. It adds a layer of flavor to whatever without overwhelming it. I’ve even used it for onions and mushrooms.

    Ingredients
    1½ c. water
    ⅔ c. soy sauce
    ½ c. bourbon
    3 tbsp. Worcestershire sauce
    2 tbsp. lemon juice
    ¼ c. light brown sugar (packed)

    Directions
    Stir to combine all ingredients. Put item(s) in a ziplock bag, pour in marinade, and close. Set in the fridge for 8 hours or overnight. Drain, discarding marinade.

    [Note: I’ve gone shorter and longer and it’s still good. If I had to go longer than 24 hours, I’d drain it and pat it dry to grill the next day.]

    Dale’s Seasoning (my lower salt version)

    Tuesday, May 15, 2018

    Here’s a recipe because I can’t find this stuff in my area. I used components of several online copycat versions. The original is much too salty for my taste, so I substituted low-sodium for regular soy sauce, and I omitted 1 teaspoon of salt.

    Ingredients
    3 cups low-sodium soy sauce
    1/2 teaspoon liquid smoke
    1/3 cup Worcestershire sauce
    1/2 teaspoon ground ginger
    2 tablespoons sugar
    1/4 teaspoon black pepper
    1/4 teaspoon paprika
    1 teaspoon garlic powder

    Directions
    Combine the ingredients in a bowl and whisk well with a wire whisk until incorporated.

    Store the mixture in a covered container in the refrigerator for up to 2 months.

    Use as a seasoning or marinade for steak, chicken, pork, lamb, fish, and vegetables. Marinate for 10-15 minutes (you don’t need much longer than that).